Donnerstag, 21. Juli 2011

In the forest

Never tryed a panorama like this but it worked very well 

And it was raining and raining and raining...the whole night and in the morning it´s gemerally like that since the last two weeks , but this afternoon the rain stoppedand I went out into the forest it was a long way to go with my bike (10km). First I walked on a paved road and then I started to walk cross country through all the brushwood.It was great to feel, see, hear and smell the nature around me,there were little whater droplets everywhere shining in the sunlight and the birds were singing.Here are some shots ive taken:
Some poisonous red berrys
sunlight shining through the trees


I don´t exactly know what these are but they look awesome

On my way back home I saw this very old car, a Ford Blitz ,which I have never seen before:

Mittwoch, 20. Juli 2011

The St. Martins Church


I just visited the St. Martin´s Church in Landshut (my hometown). It´s a very rainy afternoon just like on monday and tuesday.I wanted to go out and do sth without getting wet.So I grabbed my cam and walked into the city centre ,after I walked around a bit searching for some good shots I saw the huge church It was built in the late 14th century and was with it´s height of 133,0m (436ft) ahead of the times.The whole church is built in a Gothic style.I never went in it before, because im not a very religious person. Inside it  I realized how huge it really is ,but see for your self:


Dienstag, 19. Juli 2011

Ways to stay airborne in a glider

I think it´s time to talk a bit more about soaring, since my last five posts were all about photography. If  you have ever wondered how all these gliders,flex-wings, and hang gliders are able to stay airborne for such a long time, you´ll find your answers in this post.
Basically there are 3 kinds of up-winds that a glider is able to use, there are some more but they are either to close to the ground to or occur to rarely to be used by a glider.

  • Thermal up-winds
I´ll start off with the thermal up-winds ,because they are the most common ones.They are streams of rising air that are formed on the ground through the warming by sunlight . The warm air rises untis it reaches the
inversion that stops the warm air from rising higher.Here often form cumuli that indicate that underneath them a up-wind is located.In these thermal up-winds it´s neccesary to fly narrow circles at a slow speed to stay in it.The climb-rate depends how good your plane, your up-wind and especcialy where you are flying.
Here in germany my best climb-rate  was about 3m/s,but in tropical areas or deserts around the equator 
your climbrate can reach about 5-6m/s.
  • Ridge lift
When the wind blows on to the side of a hill it drifts it drifts upwards.Flying in this up-wind doesnt get you very high but if the wind blows day and night very seadily it´s possible to stay up there 24/7.There were many record attempts but nowadays they are forbidden because of the danger of exhaustion.
  • Wave lift
Ok now to my favourite, the wave lift.I´ve never tryed this but I will definitely have to check it out.
The powerfully rising and sinking air in mountain waves was discovered by glider pilot, Wolf Hirth, in 1933.Gliders can sometimes climb in these waves to great altitudes, although pilots must use supplementary oxygen to avoid hypoxia.
This lift is often marked by long, stationary lenticular (lens-shaped) clouds lying perpendicular to the wind.Mountain wave was used to set the current altitude record of 15,453 metres (50,699 ft) on 29 August 2006 over El Calafate, Argentina. The pilots, Steve Fossett and Einar Enevoldson, wore pressure suits. The current world distance record of 3,008 kilometres (1,869 mi) by Klaus Ohlmann (set on 21 January 2003)was also flown using mountain waves in South America.

Thats a lenticular cloud it stays extremely steady

Montag, 18. Juli 2011

Shooting Ink Droplets

Hello,
guys today I want to tell you, how to shoot Ink Droplets, that are falling into water, forming crazy shapes and patterns.I´ll tell you which equipment you´ll need and how to set up the shoot.

Equipment:

  • Various ink colors (blue,red,gree,black,...)
  • Milk
  • A dropper or pipette
  • A fishtank, or large glass container
  • A blank sheet of paper (as large as your fish tank)
  • A strong light
  • Any cam with manual focus works well
  • Some scotch tape
  • A remote for your cam if you are alone
  • A tripod
The shoot:
So first make sure that your fish tank is completely clean (no stains that could cause some unwanted reflections) then fill it with water.Now put your cam on the tripod in front of the tank. Pace the lightsource right next to your cam and switch it on. Now look through your viewfinder and search for any reflections (remove them if possible).
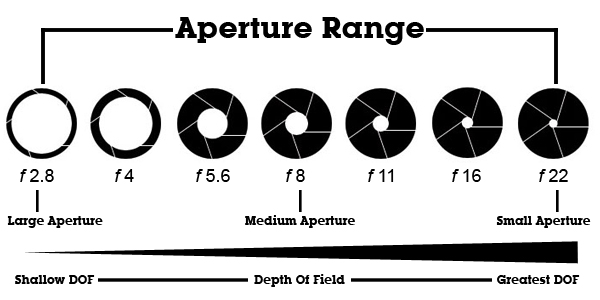
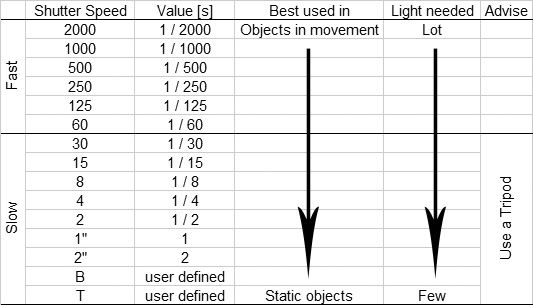
Next point is to set the camera settings to manual and set a low ISO,wide aperture and a fast shutterspeed, now also set your focus to manual and put some scotch tape over your tank (like in the picture below),

thats the level we will focus on and where we will drop the ink.Hereafter hold a pencil or any other test object at the level of the tape into your tank focus on it and lock the focus(now it´s essential not to move either the tank or the camera otherwise the shots aren´t sharp).
It´s time for the ink you can mix it with some milk ,this makes the shots more plastic and vivid .Use the pipette to drop single drops into the water at the level we already set with the tape.While you shoot i´ts useful to use the remote, so you don´t have to touch the cam anymore.

Here is my set up and some of the shots I´ve taken so far :
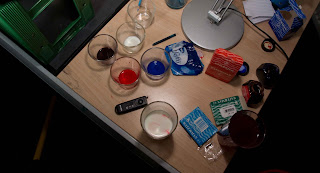
Many ink-milk mixtures I used 

well that´s my set up

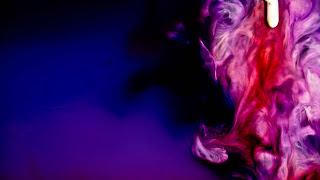
Poured a whole glass of milk in my tank looked awesome


Sonntag, 17. Juli 2011

Understanding the Factors that Affect Depth of Field


What is depth of field (DOF)

The simplest definition for depth of field is the area of your image that is in focus. More specifically, the distance between the nearest and the farthest object that are in focus. The shallowness of  the depth of field depends of the f/stop also known as aperture, the focal length of the lens, the size of the camera sensor and distances between you, the subject and the background.

Aperture or also known as f stop

The first thing we are going to talk is the aperture value. What is aperture? Well, when you look at camera lens you are going to see a maximum aperture range for that lens. For example f/3.5 – 5.6.  The main purpose of the lens is to collect light and deliver it to the camera sensor.
The aperture of a lens is the diameter of its opening. Aperture is expressed as a f/stop. The smaller the f/stop number (or f/value), the larger the lens opening (aperture). Depth of field depends of the size of the opening of the aperture. The larger the aperture opening is the more shallow the depth of field will be and opposite vice versa.

Focal length

The next thing that defines depth of field is focal length. If you have zoom lens or two prime lenses that are different in focal length you can test this yourself. The basic idea is that the longer the focal length is, the shallow the depth of field will get. And of course, the opposite is true when we have short focal lengths. For example if you shoot something with a 50mm lens at f/2.8 and then shoot the same thing with 200mm lens at f/2.8 the difference in the depth of field is going to be dramatic.

Distance between the object and background

The final thing we are going to talk about today is the distance between the object we are shooting and the background. The further away the background is from the subject, the more blurred the background is going to be. For example, if we shoot a model that is standing 3 meters away from us and the background is 5 meters behind the model, the background will be sharper than if the background were further away.

Freitag, 15. Juli 2011

Photography basics

Basicly these are the three parameters that affect how your picture looks. Each of these change the exposure of the Picture in a very different way:

Aperture. The aperture is the hole on your lens through which light travels before it hits the sensor. If you open up the aperture, more light enters the camera, and the image appears brighter. If you close the aperture, less light enters the camera, and the image appears darker.
Shutter Speed. When you adjust your shutter speed, you’re changing the duration of time the shutter stays open to allow light into the camera. If the shutter is open longer, more light will enter the camera and hit the sensor. But if you increase the shutter speed, the shutter opens for a shorter period of time and less light hits the sensor overall. This will result in a darker image.
ISO Speed. This is a number that determines the image sensor’s sensitivity to light. If it’s more sensitive, you’ll end up with a brighter image. If it’s less sensitive, you’ll end up with a darker image. ISO speed also impacts the graininess of an image. If you pick a really high ISO speed, the resulting image will be much more grainy than if you were to use a low ISO speed.
ISO 400
ISO 100
Ihope Icould help you to understand your camera better.

Donnerstag, 14. Juli 2011

The old Fabric

  I´ve visited several old fabrics in the last two years .I just like the mood there , the old rusty steel ,the broken down engines and machines and how the nature slowly takes back what once was hers .You are able to climb around, see graffiti and especially take some nice pictures.Today I was at such a fabric together with  a friend of mine:
The huge engine of a crane
A tree growing around a belt conveyor

A tiny ant climbing around on a pipe
Moss growing around a deep pit
A macro shot of rotten wood